its paid sponsors, whose products you need!

“Stay ‘unreasonable.’ If you
don’t like the solutions [available to you], come up with your
own.”
Dan Webre
The Martialist does not
constitute legal advice. It is for ENTERTAINMENT
PURPOSES ONLY.
Copyright © 2003-2004 Phil Elmore, all rights
reserved.
Gunting: An Instructor’s View
A Video Review by Phil Elmore

 Modern
Arnis practitioner Bram Frank,
the man behind the Gunting system of tools, is well-known in Filipino Martial
Arts (FMA) circles. Equally well known is the Gunting system.
Those with background in FMA will recognize the term gunting as
“scissor,” a technique that involves (for example) “destroying” a limb
by striking it from two directions simultaneously.
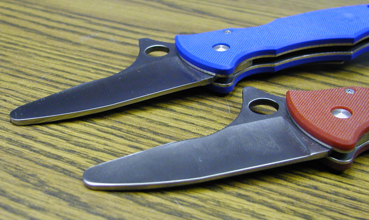
The
Gunting knife, designed to be both blade and impact tool, is well-suited to
such applications and to a variety of striking and pressure
techniques. The knife has a black handle and is accompanied
by color-coded siblings: red for the Gunting Drone
(a training tool designed for safe practice) and blue for the CRMIPT
(a “close range medium impact tool” intended for law
enforcement). The latter two do not have sharp blades. The CRMIPT
is intended for use as an impact and compliance tool.

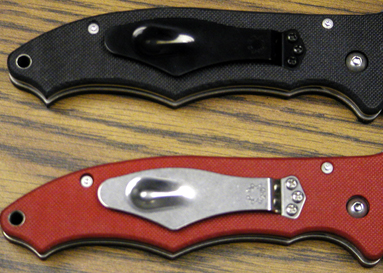
Gunting, Drone, and CRMIPT (top to bottom)
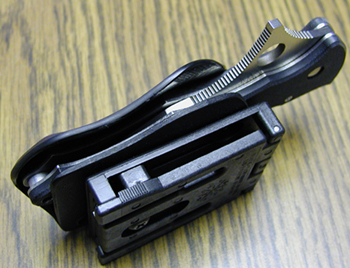
THE
TOOLS
Manufactured by the prominent Spyderco,
the Gunting knife and its counterparts
are well made and exhibit first-rate attention to fit and finish. The
knife has a subdued black pocket clip,
while the other tools have silver clips. Each is equipped with
Spyderco’s “compression lock,” which is almost a liner lock in
reverse. It is accessible from the “spine” area of the knife
near the blade tang. It took me a little while to adapt to the
compression lock, with which I managed to pinch my finger painfully at least
once.
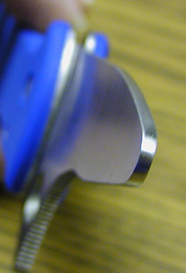
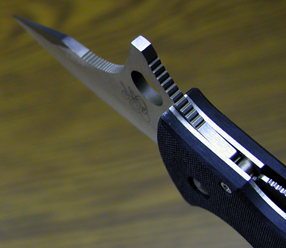
Compression lock (lower right).
Apart
from needing to tighten the pivot on my Gunting knife, I had no problems with
any of the three Gunting tools. The knife was, as is usual for Spyderco,
“scary sharp” out of the box. Releasing the compression lock,
I quickly found, will cause the blade to fall free with gravity, which could
catch the fingers of the unwary. Keep this in mind when opening and
closing the Gunting. I found the lock itself to be quite secure in use.
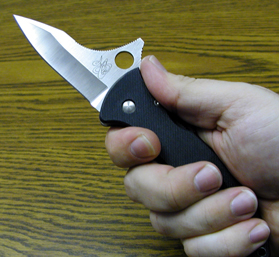
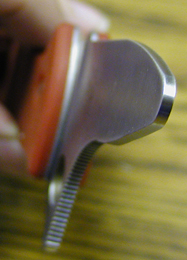
Gunting knife. Here the thumb rests on the
“ramp,”
used to facilitate strikes and pressure techniques.
THE
CONCEPT
The basic concept of the Gunting is of a
knife that is suited to less-than-lethal applications as well as to cutting
and thrusting. This is made
possible by the “horns” built into the handle (which facilitate
certain traps, holds, and pain compliance techniques) and by the prominent
Gunting ramp — the feature that makes
it most recognizable. When closed, the knife can be used for several
different techniques, most notably strikes and pocket-stick-like compliance
and defense moves using the top of the ramp to concentrate the force of your
strikes.
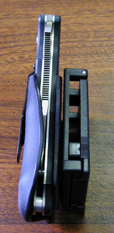
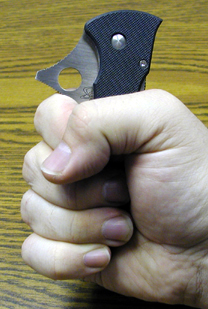
The tiny sort-of-tomahawk that is
the closed Gunting knife.
ONE CAVEAT
The
Gunting system is not without controversy. Some critics point out that
if you do cut someone with a knife that has the “less than lethal”
option the Gunting implies, you might find yourself legally liable for failing
to use that lesser degree of force. Other disputes seem to revolve
around the types of personal and political arguments that invariably erupt
over the Internet. Still others concern whether the Gunting curriculum
is practical. Each person must decide what he or she believes
regarding the system and its merits, weighing the benefits of the system and
of the Gunting as a
tool versus the potential liabilities.
GUNTING:
AN INSTRUCTOR’S VIEW
The three volume Gunting:
An Instructor’s View video series is ostensibly meant to give those who
teach the use of the tool more insight into just that. I have not
previously watched any instructional material on the Gunting system, but I
nonetheless found the tapes adequate introduction for anyone curious about the
the tools and their uses.
The sound is audible and the
picture quality just fine. Filmed against a stark white background, the
videos feature lots of slow-motion repetitions of movements demonstrated, with
changing camera angles as required. (There are times when the camera
angles are a little unusual, I think just to give the tapes more visual
interest.) There are even picture-in-picture close-ups of some segments
of the action, which is a very nice touch.
Through it
all, Bram is remarkably soft-spoken and affable as he walks the viewer through
the use of the tool he designed. While I’ve “talked” with Bram via AOL Instant Messenger and
through e-mail, I’d never before heard him speak until I watched these videos.
Interestingly, he sounded almost exactly as I pictured him — calm and
confident in the tool whose use he espouses.
VOLUME
ONE
The video begins with the warning never to
train using a live blade. (All Gunting training should be done with
appropriate training blades or the Drone itself.) Bram introduces the
Gunting system and explains the differences between the color-coded tools:
- The Drone is red and has no sharp edges. Its
“blade” is completely unsharpened. - The CRMIPT is blue and has
the Drone’s unsharpened blade. It has
sharp “horns” that are part of the handle. - The “live” Gunting is black. It has sharp
handle horns and an incredibly sharp blade.
Bram does not wear eye protection on the tapes (for purposes
of the video shoot), but he encourages students to protect their eyes when
practicing.
Bram explains that the Gunting system uses
“gross motor skills,” movements that should be simple yet effective
under stress. He goes on to explain the basic open-to-closed horizontal-vertical
scissors movement of the arms that is the foundation for the use of the
Gunting. He goes on to demonstrate several variations of this
horizontal-vertical idea — a conceptual motion that is central to the
Gunting curriculum. As you would expect from FMA, there is much checking
and passing as Bram and his training partner flow through the exercise.
Depending
on your skill level, what Bram considers “gross motor skills” may
not appear to be so to you. This is something only the individual
student can judge, particularly when considering performance under
stress. Veteran FMA practitioners swear by the sometimes complex
movements of their systems, whereas critics are quick to deride anything not
comprised of the most rudimentary mechanics.
Bram
pauses to review the material covered periodically, which is essential in an
instructional video. When he moves on it is to demonstrate the impact
caused by the closed Drone to show the power of the implement. He
strikes a variety of pressure points on his partner, such as the inside of the
arm, the shoulder, the collarbone, and the side of the neck. He also
demonstrates some arm lock takedowns. As a pressure stick the Gunting’s
utility (or, perhaps more specifically, the utility of its ramp) is
obvious.
“The tool is important,” Bram
explains. “The tool is making the difference.” He
repeats this idea often, urging students to take the advantage offered by the
Gunting.
Demonstrations of the horizontal-vertical
conceptual motion continue, this time from the inside of the opponent’s
arm. (It was demonstrated from the outside previously.) Bram then
discusses the parts of the tool: the upper horns, upper ramp, lower
horns, and lower ramp, with picture-in-picture close-up as he speaks.
In
the next segment, Bram demonstrates how to practice feeling for grabs with the
ramp. This again will seem complicated to some, but others will readily
take to it. Numerous slow-motion demonstrations of various locks follow
before Bram discusses variations on attacks from the opposite side (the
opponent’s left, if he was attacking with his right to this point).
Volume
One concludes with Bram’s exhortation to practice and with some more slow-motion
locks and grabs with the Gunting.
VOLUME TWO
Bram begins Volume
Two by showing some follow-ups to the initial horizontal-vertical
motion. This includes thumb grabs, rotations, and armbars. He
moves on to basic releases from grabs, explaining that the Drone gives you a
distinct advantage.
In what looks very similar to
Aikido or Ju Jitsu, Bram uses the Gunting to facilitate a variety of locks and
joint manipulations. He also shows escapes from chokes by poking and
pushing with the ramp.
In the next segment, Bram walks
the viewer through a basic FMA drill, the intent of which is to give the
student a feel for horizontal-vertical. It involves just what you would
expect from an FMA drill — striking, checking, picking up, clearing/checking,
and striking again. The drill will teach the student how to open and
close his body as he comes in. This is followed by footage of Bram and
his training partner engaged in an empty hand Hubud drill.
Working
the horizontal-vertical movement on the low line, rather than the high line,
Bram strikes his opponent’s leg after slapping aside the attack. He
takes the opponent’s balance in the process.
Another
picture-in-picture close-up accompanies Bram’s discussion of the Gunting’s
“spoon clip,” the wide pocket clip that is intended to be used as an
indexing point. You can spin the knife using this index, Bram explains,
showing the viewer how to spin the knife into a reverse grip to do
horizontal-vertical after his initial scissor strike. More examples
follow and there is slow-motion footage of the transition.
The
topic of “changing grips in a knife fight” will raise no eyebrows for some
readers, but others will detest the idea. Again, your skill level and
your comfort with risk will determine your personal preference and opinion on
the matter.
Another feature of the Gunting that is
often discussed is using its ramp to perform a “kinetic
opening.” This is a maneuver in which the ramp is slapped and moved
past on some part of an opponent’s body in order to open the blade. Bram cautions that while
this can be done on an opponent without cutting that person, you cannot safely
perform a kinetic opening on your own leg. You will cut yourself
if you try.
Bram then demonstrates a
horizontal-open-vertical movement (the “open” means the knife is
locked open) on both sides and performs various holds and applications using
the ramp side of the open blade. He reminds the viewer that these must never
be practiced with a live Gunting.
VOLUME
THREE
My copy of Volume Three actually proclaims
itself “Volume 2” as it opens, a typographical error that made me
recheck the box before I realized that was all it was. In Volume Three, Bram
walks the viewer through open-blade drills with the Gunting folder. He
goes so far as to say even a knife with the edge ground off is not safe (and
certainly a taped live blade won’t do). You must use the Drone or a
proper aluminum trainer.
Bram demonstrates a dexterity
drill whose purpose is to teach the student to learn to move the tool.
It’s not intended as a real-life application. He hits, spins the knife,
cuts through, hooks, spins back, and goes on like that, flowing through the
exercise. There is a picture-in-picture close-up of his footwork, too,
which is a nice touch.
A flow drill that teaches
targeting and moving from “open” to “closed” with the body
comes next. Performed with an open drone, Bram uses striking angles from
Remy Presas’ Modern Arnis. Specifically, he uses angles 1 through 5 (5
being a straight thrust) and 12 (an overhand strike).
Flowing
through the six cutting angles, Bram shows the viewer how to respond to each
of them as they come in. He also demonstrates empty hand responses to
the same attacks, integrating his body movement. Slow-motion footage of
the angles follows, as well as several sequences showing the flow drill being
performed without commentary.
Demonstrating a
counter-for-counter drill, Bram talks about “responsible
cutting.” He breaks it down into several moves, including cutting,
checking, and countering the incoming cut. The drill is done on
different lines, too.
In an interesting look at
dealing with a knife-wielding attacker while armed with a Gunting, Bram
attacks his training partner with an open blade. The partner, in turn,
responds with a closed Gunting, which comes open as he draws and
counters. This is followed by a brief look at using the compression lock
to drop the blade closed in order to return the open “live” Gunting
to its “impact tool” mode, with more of the picture-in-picture
close-ups that I now associate with this series.
“With
this video,” Bram concludes Volume Three, “you can learn how to
teach [the Gunting] — and use it properly.”
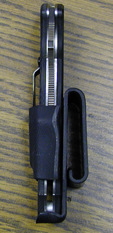
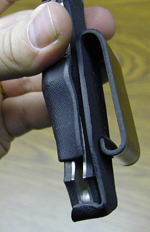
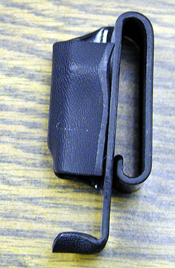
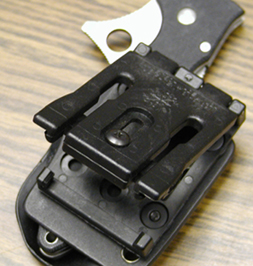
SHEATHS
The
Gunting is a large folding knife that really demands a belt sheath to meet its
full potential. While the pocket clip is an important part of the knife,
given the indexing point it provides, I would not choose to carry the knife in
my pocket. This is obvious to most and belt sheaths for the Gunting are
readily available.
The official color-coded sheaths for the Gunting are
made by Skunkworks of Kydex. A single
piece of material that incorporates a well-designed
belt clip, these are simple,
light, and inexpensive. They leave as much of the knife exposed as
possible.
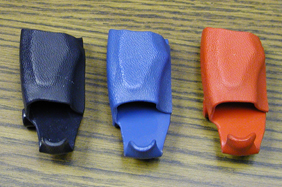
Gunting, CRMIPT, and Drone sheaths.
Skunkworks Gunting sheath on belt.
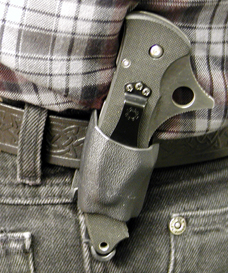
The
only real drawback to the Skunkworks sheaths is the fact that they can and
will shift slightly on your waistline, depending on the width of your
belt. If you want a sheath that covers (and therefore protects) more of
the knife and are not worried that this will hamper your draw of the Gunting,
Bob at Survival Sheath
manufactures a Tek-Lok-equipped
clamshell model. It positions the
knife farther from the body, which is
either good or bad depending on your needs and preferences.
Survival Sheath Gunting model.
TYING
IT TOGETHER
As someone who has always been drawn
to FMA and who now cannot stop playing with his Gunting drone, I’d have to say
I think these knives and their accompanying tapes are at least worth a look. You may decide that the
system isn’t worthwhile to you, or that it is too complicated to be practical,
or you may decide that you think you have the ability and the patience to make
the Gunting (and its system) part of what you do.
The
choice is yours.