its paid sponsors, whose products you need!

| Home |
| Intro |
| Current Issue |
|
Mailing List |
| Store |
| Strength |
| Subscriber Content |
| ARCHIVES
|
| Martialism |
| Pacifism |
| Q & A |
| Cunning-Hammery |
| Advertise With Us |
| Submit An Article |
| Staff |
| Discussion Forum |
| Links |
“Stay ‘unreasonable.’ If you
don’t like the solutions [available to you], come up with your
own.”
Dan Webre
The Martialist does not
constitute legal advice. It is for ENTERTAINMENT
PURPOSES ONLY.
Copyright © 2003-2004 Phil Elmore, all rights
reserved.
The Martialist’s Guide to Knife Sharpening
By David F. Craik with Phil Elmore
The purpose of this article is to describe and
illustrate techniques for sharpening a
knife using both modern and traditional methods. The techniques shown here
are by no means the only ways
to sharpen a knife, obviously, as other types of hones and knife
sharpening systems like the Lansky can produce very good results.
However, I am constantly surprised at the number of folks who don’t have any
idea how to sharpen a knife properly. Those of us who do wind up sharpening knives for
friends who, despite the fact that they often use and carry knives, haven’t
the foggiest notion of what to do when their blades get dull. The methods here will
illustrate basic principles and techniques that are applicable to other
methods of sharpening as well. A knife is the single most useful tool known
to man. Every knife owner should know how to maintain this tool.
Contemporary Hones
Let’s first discuss
contemporary sharpening methods using diamond stones and hones. Diamond
hones produce an edge that is serviceable. Because such hones use
diamond grit as an abrasive, they produce results very quickly. The
relatively course surface of such hones produces an edge that is not as
polished as those produced with traditional whetstones, however. The
Martialist‘s publisher, Phil Elmore, swears by diamond hones and always
carries a diamond rod for fast field-sharpening results.

Clockwise from bottom left: EZ-Lap pen rod, EZ-Lap
diamond pad, and Smith’s retractable diamond rod.
Diamond rods are used most often to sharpen serrated blades. A good
tapered rod is indispensable for touching up such scalloped edges, as there is
no way to preserve the serrations when sharpening the knife on a traditional
stone. (You can sharpen a serrated blade on a stone, but the result will
be a sharp blade with contours rather than a truly serrated edge.)
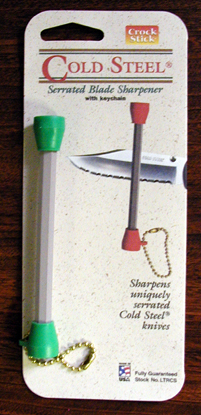
Sharpening Serrations
To sharpen serrations, choose a rod that is tapered
sufficiently to fit the scallops of your knife’s edge. Knives made by
Cold Steel have notoriously small “teeth,” but there are “crock
sticks” on the market designed specifically for them. A crock stick
is the ceramic equivalent of a whetstone. Its flats can be used for
traditional sharpening and its corners can be used to sharpen serrations.
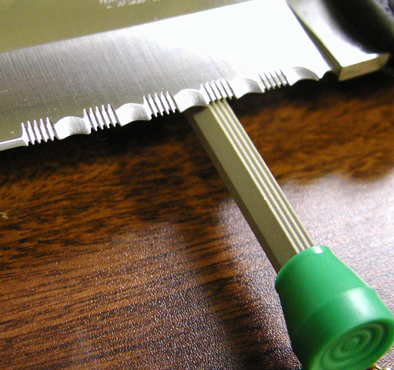
This crock stick’s grooves are
designed specifically for
Cold Steel’s smaller serration pattern.
Using the rod (or a suitable crock stick corner), place the
hone at an angle. As we’ll learn when we get to traditional whetstone
sharpening, this angle is roughly 20° but not always. Try to match the
angle at which the serrations are already ground for fastest results.
Otherwise, you’ll end up having to reprofile the entire edge to meet your new
angle. Once your angle is set, simply draw the hone through the
serration, back and forth, as if you are trying to saw the blade in half
at the serration.

Place the rod at the appropriate angle to
the serrations.

Push and pull the hone through each serration individually, moving
perpendicular to the blade, as if you are digging each individual serration
deeper. Each scallop is honed individually. It takes a while.
Rod-Sharpening Plain Edges
A rod
(or even the corner of a crock stick) can easily be used to sharpen a plain
edge. Placing the rod at the appropriate angle on the edge, you simply
draw it across the length of the edge, turning it as the edge curves to
maintain the angle. The process is repeated on the reverse. If you
are consistent your sharpened sides will meet each other, forming a nicely
honed edge. If it will catch on your thumbnail, it’s generally “sharp
enough” for a working edge (at least by Phil Elmore’s standards). Click
here to see this process illustrated
with a Swiss Army Knife.
Sharpening with Diamond
Pads
Expediently honing a blade with a diamond pad
is much the same process, though you have more surface area to work with.
Again placing the edge against the pad at the angle already ground on the
blade, draw the edge against the surface of the hone as if you are trying to
shave a thin slice from the pad. You can go entirely in one direction or
you can use a methodical, almost soothing circular motion on the surface of
the pad. You’ll have to adjust the angle of the knife on the stone as
the edge curves, which will com with practice.

First hone one side of the blade, maintaining the proper angle…

…and then do the other side. Be very careful to stay consistent.
Traditional Sharpening
How I sharpen
traditionally depends on how sharp the knife is before I start. It also
depends on the blade
shape and the knife’s intended use. You don’t want a razor sharp edge for a
work knife because it’s more prone to chipping, for example. The blade angle
will also vary based on blade thickness, design, and how fine an edge you
want. For some blades, like the straight edged sheepsfoot or wharncliffe, a
slight difference of technique is used. On others, like the hawkbill or
serrated edges, a cylindrical hone is pretty much required as has already been
described.
To illustrate traditional sharpening I have selected a stag handled Kissing
Crane stiletto with a clip point blade, as I consider clip and drop points the
easiest to sharpen. They are thus good for the basic techniques shown
here.
I start with a soft Arkansas stone. It is called soft because it is a
coarser grain. Place a light coat of oil on the stone. Clock oil works best,
but any oil will do…and even water or saliva will work in a pinch. The oil is only there
to provide a medium on which the blade will slide.
The blade should be placed on
the stone at the same angle as the existing bevel of the blade, which is normally
about 18 – 20 degrees. Slide the blade forward, simultaneously sliding
the blade to your left (if you are right handed) until it reaches the
opposite end of the stone. It should feel like you are attempting to cut a
thin slice of stone from the top, like a piece of cheese. Repeat 9 more
times.

Starting the pass. (Red on the blade
is a reflection only.)

Finishing the first pass. Repeat as described.
Once you’re finished with the obverse, do the reverse. (Flip the knife
over and do the other side, in other words.) Starting from the opposite
side of the stone and the opposite end of the blade from the tip (nearest the
handle), draw the blade toward you as you “slice” the other way. Do this 10 times
as well. The secret is to make sure you do each side the same number
of times and keep the blade at the same angle throughout. Consistent
angles meet for a very keen edge.

Starting the first pass on the reverse.

Finishing the first pass. Repeat as described.
Repeat the process on both sides of the blade, ten times each, until you feel no resistance. You will need to
wipe off and re-oil the stone when it becomes too messy. You don’t want all
the little particles of metal screwing with your edge uniformity.
Okay, your edge will be pretty good now good enough for a knife used for
heavy work, at least. Do you want it even sharper? Break out your Arkansas
hard stone. If you
don’t have one of these, you can start over again with the Arkansas soft
stone but with less of an angle to make it sharper. This changes the edge
geometry and messes with your bevel though, so I prefer using the hard stone
next.

You can use a harder stone, or you can use the soft
stone but grind a more shallow angle into it.
Do the exact same thing with the hard stone that you did with the soft one.
Do you want it still sharper?
For really sharp edges I have a flat ceramic stone. It has next to no resistance to begin
with. You use only a tiny bit of water on it instead of oil. This will
polish the edge put on by the other two stones. Use the same technique, about 10-15
times on each side.

The final edge honing on a flat ceramic “stone.”
Now, let’s say you want your blade even sharper. If that’s the case, we’re on to the razor
strop. I made my strop myself out of a wide, thick piece of leather I found. A
wide, thick belt can be used in a pinch, though. Bear in mind that not all
blade types can be stropped. A thick, highly figured blade with heavy grind
lines cannot be stropped, for example. Here you are going to do the opposite motion as
with the stones, which is kind of like “wiping” the edge down the strop (about ten
times each side).

Wipe the strop, blade away…

…then strop the other side.
Congratulations! Provided your knife is of good steel, you’ve now got a razor
sharp edge that will last a long long time. The process is time consuming, but I think
this traditional method produces superior and uniform results.

Your sharpened edge will slice cleanly through paper.
As the edge is the very heart
of the blade, it is well worth the effort to do it properly.