its paid sponsors, whose products you need!

“Stay ‘unreasonable.’ If you
don’t like the solutions [available to you], come up with your
own.”
Dan Webre
The Martialist does not
constitute legal advice. It is for ENTERTAINMENT
PURPOSES ONLY.
Copyright © 2003-2004 Phil Elmore, all rights
reserved.
Eye Protection for Knife Training
By Guro William Schultz
WARNING: Knife training is an inherently dangerous activity. Take these suggestions
at your own risk.The Martialist
disclaims any liability resulting
from injuries sustained while training using these ideas.
As with training knives, I
needed some choices — in this case, as to the
amount of head protection I used for myself and my students. Some
students are unwilling to make the leap to fencing masks right off the bat.
By making these modified helmets, I can start them off with something heavy-duty and then gradually
wean the students to the lighter helmets (after they have developed some
ability and courage). I also wanted to use the helmets for
blade sparing, so I had to come up with a way to close up the gaps
in the cages to prevent thrusts or slashes to the face from getting through.
Basically I wanted a helmet that offered a little more protection and better
visibility then a fencing mask, yet still allowed good shots to the head to
be felt (so you know you did something wrong). The helmet will protect your head
from heavy hits, but the reverberation from the hit can be disorienting. This
helps prevent the student from developing the bad habit of taking shots to the head to get into
corto
range. With heavier helmets you may not even realize you have been hit.
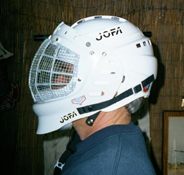
I
ended up using a standard Joffa hockey helmet with a full face goalie
attachment that offers a little neck protection. (If you keep your chin down
like you should, it actually does a great job.) To offer protection from
stick thrusts and knives during blade fighting, I removed the cage and
took some 1/4″ steel mesh, cut it slightly larger than the cage shape, and
then formed it to the cage using heavy duty black zip ties (white is too
distracting when looking through the cage).
 To
To
make this modification, start at the center and work your way out, attaching zip ties at every
juncture. Turn the zip lock to the inside of the cage and cut off the excess
with wire cutters as close to the zip lock as possible. When you get to the
edge of the cage, cut off any excess mesh so you are left with about 1/2″
off mesh protruding from the edge all around.
Roll around the edge to the
inside and fasten it with the ties. Cut off any protruding wire. The mesh
should be VERY tight to the cage. Rub your hand along the outside and make
sure there are no sharp edges. Like a fencing helmet, it will have a bit of
a “cheese grater” effect if your opponent tries to punch or elbow to the
face using exposed skin. It’s a good idea to wear light gloves and elbow
pads. I’ve been thinking that one of these days I might take the mask off
and dip it in “Tool Dip” to give it a rubberized coating. The helmets I modified
have held up
great and so far I have only had to replace a couple of zip ties that took a
number of hard hits.
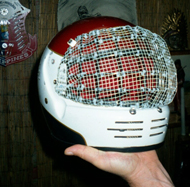
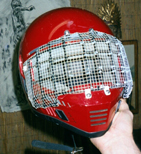 Two
Two
of the helmets shown here are obviously motorcycle helmets. They both have
slightly different shapes. The key here is finding a cage that is as close
as possible to the shape of the helmet face. I took both helmets to a hockey
shop that sold used gear and held all the cages they had to the helmets to
find the closest fit.
On the white motorcycle helmet, the cage is actually upside down
compared to its original placement on a hockey helmet. I had to trim a
little off both cages to get them to fit adequately. Now, here’s where
things get a little fuzzy. I don’t know the proper terms for some of these
parts but I will do my best to describe them:
After you have cut the cages to fit, apply the steel mesh as described
above. Next, you will want to determine where to fasten the cage to the
helmet. I put two fasteners on the top, bottom, and both sides. The
fasteners as seen on the white motorcycle helmet are white and “d” shaped.
The
fastener opens so that you can slide the edge of the cage down to the inside
of the “d”. There is a mounting hole at the top of the cage.
Mark where the
holes are and drill about a 1/4″ hole, no more than 1/2″ deep. Now, I’m
going to get technical on you here. A screw will not hold if you try to
fasten it directly to the helmet (it’s just Styrofoam in there). The anchors
that I used look like rubber plugs with a screw head on one end and a nut
on the other. Take the screw out and thread it through the cage fastener
(“d”). Thread it back into the rubber plug and then insert the plugs into
the mounting holes you drilled into the helmet. As you tighten the screw, it
pulls the nut up causing the rubber plug to expand inside of the hole. These
hold surprisingly well.
There you go.
The helmets are not the prettiest things out
there, but they have taken a lot of abuse and are still going strong.
 Guro William Schultz
Philippine Combative Martial Arts
Mongrel Combative Arts Club
Specializing in Pekiti-Tirsia Kali, Muay-Lao Thai Boxing, &
Jeet Kune Do Concepts
Durning’s Martial Arts Center, in
association with the Mongrel Combative Arts Club and the Rhode Island
Pekiti-Tirsia Kali Training Association: East Greenwich, R.I. 401-886-7315